High efficiency and high precision automatic processing hobbing, grinding, honing, easy to say!
With the development of machining industry, precision and automation are important trends. The gear industry, which is widely used, is also facing this development trend. High precision and efficient automatic processing is the goal of gear enterprise transformation and upgrading. The key to achieve this goal lies in the fixture, which needs to be flexible, stable and cost-effective, and can realize automatic production on the existing machine tools.
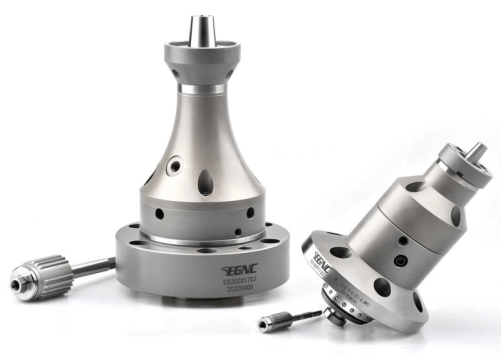
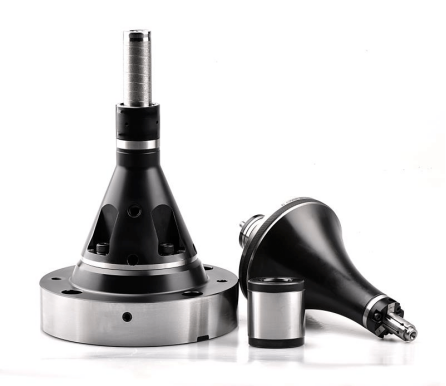
In this context, a number of enterprises with high comprehensive strength emerged in China, they are committed to providing a complete set of fixture solutions for the gear processing industry, such as Envision Tools. In recent years, Envision company has made excellent achievements in the development of hydraulic expansion fixture, and at the same time, it has made a qualitative leap on the road of localization of mechanical fixture with adhesive clip head. Envision hydraulic expansion and mechanical gear processing fixtures are widely used in hobbing, grinding, honing and gear processing fields, providing the corresponding solutions for the processing of the above fields, which are favored by customers.
So, let's take a look at what is a fixture, what are the advantages of high-end clamp and how to achieve hobbing, grinding, honing efficient, high precision and automatic processing.


01
Definition of fixture and advantages of high-end fixture
Definition of fixture
Fixture is used to fasten the workpiece quickly during processing, so that the machine tool, cutting tool, workpiece to maintain the correct relative position of the process device. That is to say, fixture is an indispensable part in machining with tools, measuring tools, molds and other technological AIDS. In the machine tool technology to high speed, high efficiency, precision, composite, intelligent, environmental protection direction of development, fixture technology is moving towards high precision, efficient, modular, combination, general, economic direction.
Advantages of high-end fixtures
1. Can guarantee the product processing accuracy stably;
2. Reduce auxiliary working hours and improve production efficiency;
3. Reduce labor intensity;
4. Expand the scope of processing equipment;
5. Reduce parts processing costs.
02
Gear hobbing technology
What is gear hobbing
Gear hobbing is a common gear machining method. Its cutting process is discontinuous cutting, accompanied by forced and self-excited impact force. Therefore, hobbing has great requirements on the rigidity and clamping force of fixture itself. In the ordinary hobbing machine can be processed 7/8 grade precision gear, in the high precision hobbing machine, using precision hob, can be processed 4/5 grade precision gear. While ensuring the precision of machine tool and hob, the clamping precision between gear workpiece and fixture should also be improved.
Gear precision mainly includes motion precision, smoothness precision and contact precision. In gear hobbing, the length variation of common normal and ring diameter jump are controlled to ensure the motion accuracy, the working smoothness accuracy is guaranteed by the control of tooth shape error and base pitch error, and the contact accuracy is guaranteed by the control of tooth direction error.
What’s the reason of hobbing which easy to cause errors in machining
(1) ring radial runout error (that is, geometric eccentricity) : in the installation of parts, parts of the rotary center and the rotary center of the workbench installation do not coincide or deviation is too large and caused by ring radial runout error, or because of hobbing machine top and hobbing spindle hole manufacturing is not good, so that the positioning surface contact is not good caused by eccentricity.
(2) common normal length error (i.e. motion eccentricity) : the common normal length error is mainly caused by the uneven rotary accuracy of the worm pair of the hobbing machine table and the wear of the circular guide rail of the hobbing machine table, and the divergence of the worm gear and the circular guide rail. In addition, there is serious knock on the tooth surface of the split gear or too loose or too tight occlusal will also affect the deviation of the common normal.
(3) Tooth profile error analysis: the tooth profile error is mainly determined by the hob tooth profile, hob grinding quality is not good prone to tooth profile error. At the same time, the radial runout and axial movement (that is, the installation error) of the hob also have an effect on the tooth profile error.
(4) Tooth direction error analysis: the main reason for tooth direction error is that the vertical feed direction of machine tool, tool rest and fixture is offset from the axis of parts, or the tail seat center of gear hobbing machine is inconsistent with the rotary center of the workbench. In addition, the low precision of manufacturing, installation and adjustment of gear hobbing fixture and gear blank will also cause tooth orientation error. The tooth direction error of gear comes from the error of machine tool, tooth blank and fixture.
(5) Tooth surface roughness analysis: the main reasons for poor tooth surface roughness are as follows: the overall rigidity of machine tools, cutting tools and workpiece systems is insufficient and the gap is large; The relative position of the hob and the workpiece changes; Hob grinding improper, uneven parts material; Improper selection of cutting parameters, etc.
Case analysis
All kinds of errors in gear hobbing are mainly caused by the precision of the machined parts themselves, the precision of the machine tools and fixtures, the cutting tools and the whole process system, and the adjustment in the process. From the above analysis, it can be seen that the manufacturing and installation accuracy of gear hobbing fixture is not high, which will produce radial runout of gear ring and tooth orientation error. The installation accuracy of the gear blank also depends on the manufacturing accuracy and installation accuracy of the fixture.
■ Disc gear hobbing spindle design, usually to the workpiece hole, end positioning, in order to improve the rigidity of the system, the general machine tool spindle to provide tension, and then the top of the machine tool, the upper gland support.

■ For shaft gear parts, gear hobbing fixture structure is generally up and down the top of the positioning and clamping workpiece outside the circle. Therefore, the quality of the top manufacturing accuracy has a great impact on the ring ring diameter jump, the cone surface is not allowed to knock and excessive wear.

■ In improving the fixture manufacturing accuracy at the same time, the manufacturing accuracy of the hob bar, knife pad, nut should also ensure that the minimum precision of the tool bar diameter must be 6 manufacturing, the use of liquid expansion hob bar can ensure that the hob clamping accuracy ≤0.005mm.

03
Grinding and holding technology
What is gear grinding
Gear grinding process is the main method to eliminate heat treatment deformation and improve gear precision and roughness after tooth surface is hardened. Because of its grinding accuracy can reach more than 6, and has high processing efficiency, in the automotive transmission industry has been widely used.
At present, the two most widely used gear grinding methods are worm grinding wheel and forming grinding wheel. The worm grinding wheel is used to grind gears according to the principle of developing process. According to the principle of forming process, a wheel with specific profile is used to grind gears. Worm grinding wheel grinding method is mostly used in small modulus, large batch production occasions, and large diameter, large modulus more than 6mm gear grinding wheel shape.
The main purpose of gear grinding is to improve the quality and performance of gear, so gear grinding technology has higher requirements on the positioning and clamping of gear workpiece. The manufacturing and installation accuracy of gear grinding fixture directly affects the control of gear workpiece tooth shape and tooth orientation error.
Key points of grinding fixture design
1, grinding fixture design should consider the installation reliability, and as far as possible to design a simple structure, as few connecting parts as possible, in order to reduce the cumulative error between the connecting parts, so that the processed workpiece has a good high precision clamping positioning;
2. The maximum positioning datum of parts should be selected as far as possible on the clamping datum surface to ensure that the maximum transfer torque can be obtained with the minimum clamping force;
3. The structure of machine tool and the working range of grinding wheel should be considered in the selection and design of fixtures.
Definition of gear tooth shape error and tooth orientation error
The tooth profile error refers to the normal spacing between tooth profiles with the shortest distance and the actual tooth profile excluding the top of the gear, within the operating range of the tooth profile on the cross section of the gear. Due to the existence of a certain tooth profile error, the actual meshing point will deviate from the matching line, which will lead to the transmission ratio mutation in the meshing of the two teeth, which will seriously affect the stability of the transmission action.
The tooth orientation error refers to the effective part of the tooth width on the corresponding indexing cylindrical plane, but excluding the end chamfering, including the actual face spacing between tooth lines. For the contact accuracy of different gears, tooth orientation error is a very important evaluation standard, it will have a serious impact on the contact point specification and specific position, but also determines the service life and bearing capacity of gears.
Case analysis
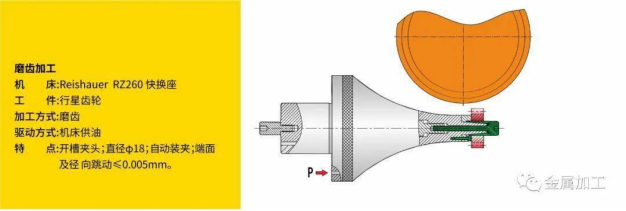
■ The design of the fixture of the workpiece of the plate tooth gear is usually positioned by the inner hole of the workpiece. For the workpiece with the size of the inner hole 12≤D≤22, the hydraulic expansion fixture is used. The accuracy of the inner hole of the workpiece is recommended to be level 7 or above. When the size of the inner hole D is greater than or equal to 22, it is recommended to use mechanical fixtures such as adhesive chuck or slotted chuck.

■ The design of shaft gear workpiece fixture, the workpiece is located in the outer circle, usually using a double top plus a clip, commonly used hydraulic expansion fixture, hydraulic mechanical fixture and friction cone fixture; For the liquid expansion fixture general design activity center guide workpiece clamping; Hydraulic rotary or friction cone fixture can be used when the diameter of tooth root circle is close to that of gear clamping part.

04
Honing and holding technology
The bearing capacity, motion stability and service life of gears are mainly determined by the contact condition of meshing tooth surface under actual working conditions, and the microscopic geometry of tooth surface has a great influence on the vibration noise and service life of gears. Honing can obtain the ideal microscopic geometric morphology of tooth surface, especially the unique tooth surface pattern, which has a very obvious suppression effect on the vibration and noise of the transmission device. Therefore, honing technology has been applied and developed in the precision machining of automobile gear.
Gear honing principle
The honing principle is similar to gear shaving. The honing wheel and the workpiece are similar to a pair of helical gears engaged without backlash. The relative sliding of the meshing place is used to apply a certain pressure between the tooth surfaces to carry out the honing.
Honing has the same motion as shaving. That is, the honer drives the workpiece to rotate at high speed, and the workpiece reciprocates along the axial direction and the radial feeding movement of the workpiece. Different from shaving, a radial feed is fed to a predetermined position after starting, so the pressure on the tooth surface is large at the beginning, and then gradually decreases, until the pressure disappears, the honing will end.
Development of honing process
Honing processing technology has experienced soft honing, CBN grinding wheel hard honing and strong honing technology.
1. Soft honing: Traditional gear honing gear machining application form or worm gear honing wheel and the plover do free meshing movement, the equivalent of a pair of interlaced helical gear transmission, took advantage of the relative sliding between the meshing tooth surfaces and the pressure for plover cut, honing wheel adopts has a certain elasticity of synthetic resin or synthetic rubber, mesh in a free state, the honing wheel main finishing effect, remove surplus co., LTD., It has limited ability to correct the precision of gear, and the error reflection is difficult to restrain. The precision of gear mainly depends on the precision of cutting gear and heat treatment.
2.CBN grinding wheel hard honing: Hard plover wheel gear honing technology is made gear of plover rounds of substrate, medium carbon steel plate for deposition of superhard abrasive besmear is on tooth surface of steel matrix, and rely on honing gear superhard abrasive to honing on the surface of the workpiece, material removal ability, and honing wheel to improve rigidity, in addition to the light, also can correct form of the gear, coxa, tooth to error, and the precision of gear can be improved significantly.
3. Powerful Honing: As the gear precision and tooth surface quality requirement enhances unceasingly, as well as the electronic gear box, automatic up-down material, in machine test, error correction, direct drive, the introduction of advanced technology such as CAM, opened the distinctive power gear honing machine, honing wheel and the workpiece mesh force, in the gear precision has a strong ability to correct the, can significantly improve the gear accuracy, The precision of powerful honing can reach DIN5, and the surface roughness Ra < 0.2μm.
Honing technology is no longer just an auxiliary finishing process, it can be used as an independent finishing way and gear grinding technology to form complementary advantages.
Advantages of powerful plover
1. Tooth surface pattern is beneficial to reduce vibration noise of gear;
2. Form high residual compressive stress (1000~1600N/mm²), effectively improve the strength, wear resistance and pitting resistance of gear;
3. Tooth surface without grinding burn, thermal stress, material microstructure change, no grinding burn, effectively improve gear life;
4. High tooth surface roughness can be obtained, Ra < 0.2μm;
5. It can process the gear with shoulder, no need to feed along the axial direction of the workpiece, compared with grinding machining requires a certain amount of head, more suitable for processing the compact gear workpiece with shoulder;
6. Economical finishing process: especially in mass production, the ceramic sintered honing wheel has a long life and the tool cost is low.
Case analysis
Liquid Expansion Fixture

Mechanical Fixture

Hydraulic Rotary Fixture
